Table of Contents
A. Installation Instructions
System Requirements
- Node.js 16.x or higher
- npm 8.x or higher
- Modern web browser (Chrome, Firefox, Safari, Edge)
- Vite 5.x (included in dependencies)
Step 1: Clone the Repository
Clone the repository to your local machine using Git:
git clone https://github.com/your-username/real_estate_dashboard.git
cd real_estate_dashboard
Step 2: Install Dependencies
Install all required dependencies using npm:
npm installStep 3: Configure Environment Variables
Create a .env file in the root directory with the following variables:
VITE_APP_TITLE=Dubai Real Estate Dashboard
VITE_API_URL=https://your-api-url.com
Note: For development purposes, the dashboard uses mock data by default. No API connection is required to test the functionality.
Step 4: Start the Development Server
Run the development server to start working with the dashboard:
npm run devThe application will be available at http://localhost:5173 by default.
Step 5: Build for Production
When you're ready to deploy, build the production version:
npm run buildThe built files will be in the dist directory, ready to be deployed to your hosting provider.
B. Demo Content Import
The dashboard comes with pre-configured demo content to help you get started quickly.
Using Demo Data
The demo data is automatically loaded when you start the application. It includes:
- Sample properties with images and details
- Mock clients with contact information
- Example payment plans and commission structures
- Off-plan construction projects with milestones
- User accounts with different permission levels
Importing Your Own Data
To replace the demo data with your own:
- Navigate to the
src/utilsdirectory - Modify the following files with your data:
mockData.ts- General dashboard datamockCommissionData.ts- Commission-related datamockOffplanData.ts- Off-plan construction data
Tip: For production use, you should replace the mock data services with actual API calls. The structure of the mock data matches the expected API response format.
Default Login Credentials
Use these credentials to log in to the demo dashboard:
Email: ahmed@example.com
Password: password123
This will log you in as an admin user with full access to all features.
C. Customization Guide
Theme Customization
The dashboard uses Tailwind CSS for styling. You can customize the theme by modifying the following files:
1. Tailwind Configuration
Edit tailwind.config.js to change colors, fonts, and other design tokens:
/** @type {import('tailwindcss').Config} */
export default {
  content: ['./index.html', './src/**/*.{js,ts,jsx,tsx}'],
  theme: {
    extend: {
      colors: {
        primary: {
          DEFAULT: '#6366F1',
          light: '#818CF8'
        },
        secondary: '#1F2937',
        accent: {
          DEFAULT: '#F59E0B',
          light: '#FCD34D'
        }
      }
    },
  },
  plugins: [],
};
2. Global CSS Variables
Edit src/App.css to modify CSS variables used throughout the application:
:root {
  --primary: #6366F1;
  --primary-light: #818CF8;
  --secondary: #1F2937;
  --accent: #F59E0B;
  --accent-light: #FCD34D;
  --success: #10B981;
  --warning: #F97316;
  --error: #EF4444;
  --background: #F8FAFC;
  --foreground: #1F2937;
  --card: #FFFFFF;
  --card-foreground: #374151;
  --border: #E2E8F0;
  --input: #F1F5F9;
  --ring: #94A3B8;
  --radius: 0.5rem;
}
Layout Customization
1. Dashboard Layout
The main dashboard layout is defined in src/components/layout/DashboardLayout.tsx. You can modify this file to change the overall structure of the dashboard.
2. Sidebar Navigation
Customize the sidebar navigation in src/components/layout/Sidebar.tsx:
const navigation = [
  { name: 'Dashboard', path: '/dashboard', icon: LayoutDashboard },
  { name: 'Properties', path: '/properties', icon: Building2 },
  // Add or remove navigation items here
];
3. Header Customization
Modify the header in src/components/layout/Header.tsx to change the top navigation bar.
Component Customization
1. Cards and UI Components
Most UI components are in the src/components directory, organized by feature:
src/components/properties- Property-related componentssrc/components/clients- Client management componentssrc/components/commission- Commission calculation componentssrc/components/offplan- Off-plan construction componentssrc/components/dashboard- Dashboard overview componentssrc/components/reports- PDF report generation componentssrc/components/commission- Commission management components
2. Page Customization
Individual pages are in the src/pages directory. Modify these files to change the content and layout of specific pages.
3. Adding New Components
To add a new component:
- Create a new file in the appropriate directory under
src/components - Import and use the component in the relevant page
- Add any necessary types to
src/types
D. Visual Elements - Key Pages
Note: You can also download reports in the following pages : Dashboard , Property Evaluation , Property Calculator , Commision , Off-plan constructions plan
Note: The Download will be as .pdf file example is image below
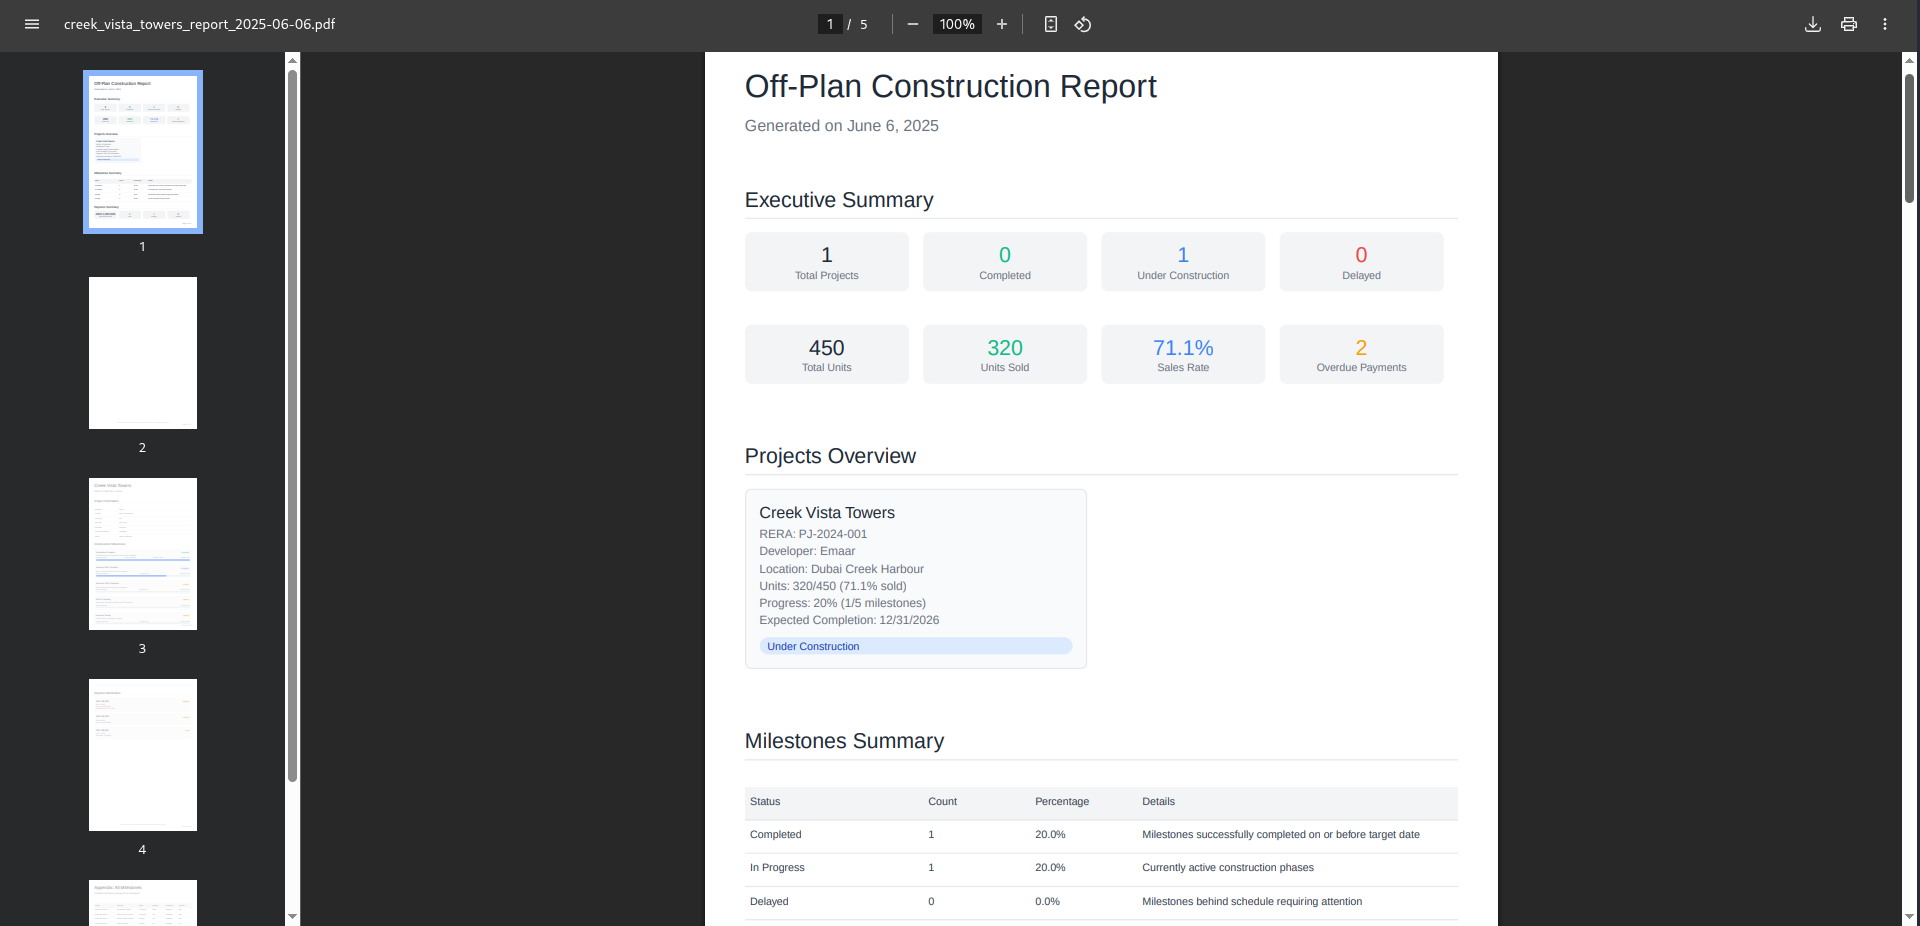
D.1 Dashboard Overview
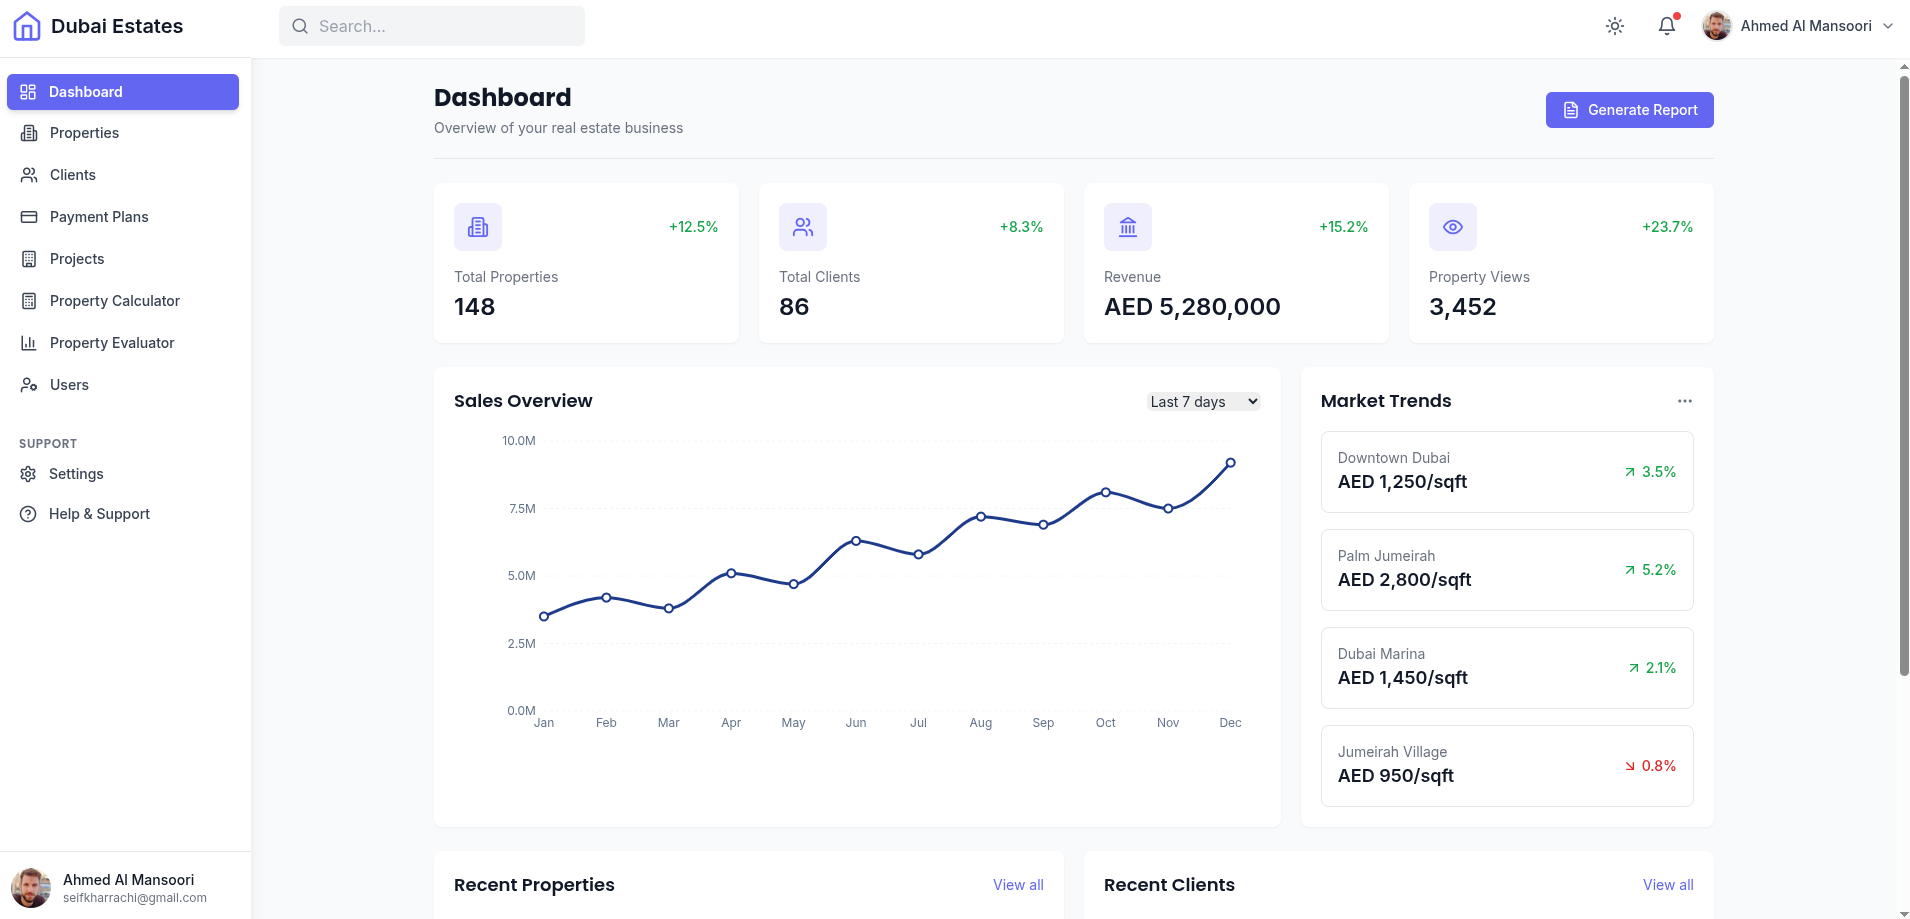
- Stats Cards: Display key metrics with change indicators
- Sales Overview Chart: Interactive chart showing sales performance
- Recent Properties: List of recently added properties
- Recent Clients: List of recently added clients
D.2 Property Management
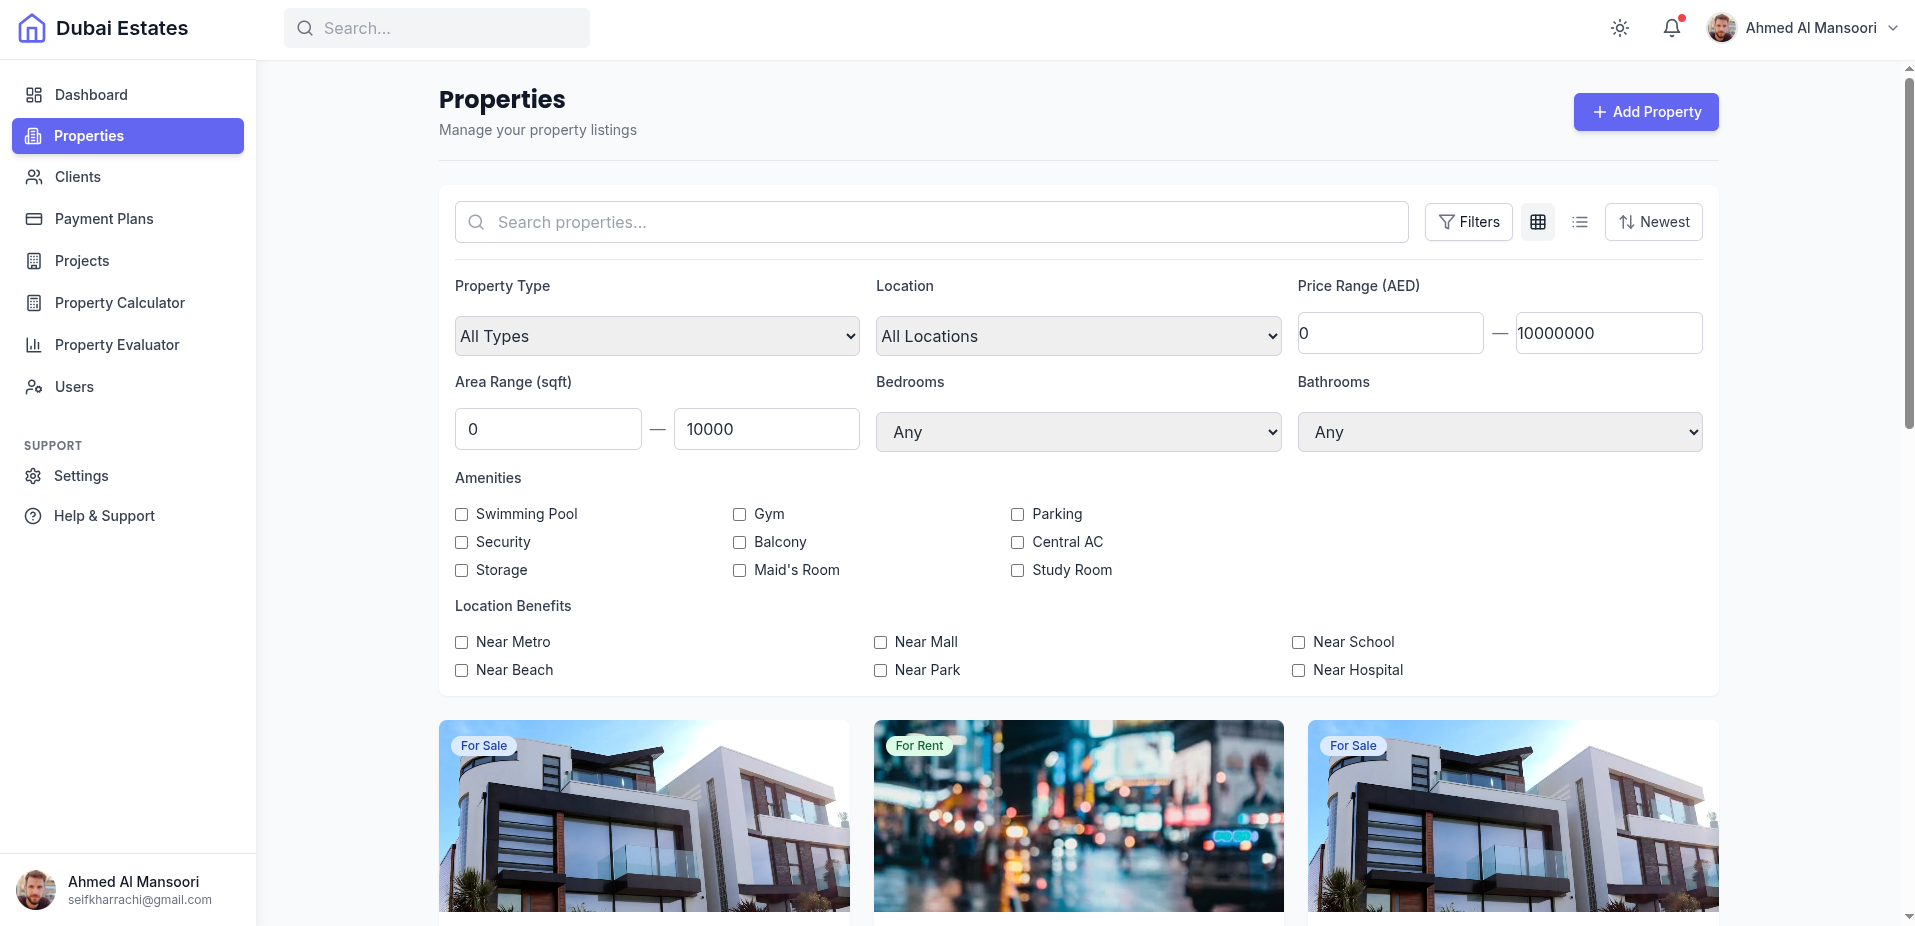
- Search and Filter: Tools to find specific properties
- View Toggles: Switch between grid and list views
- Property Cards: Display property information with actions
- Action: Add Property
D.3 Client Management
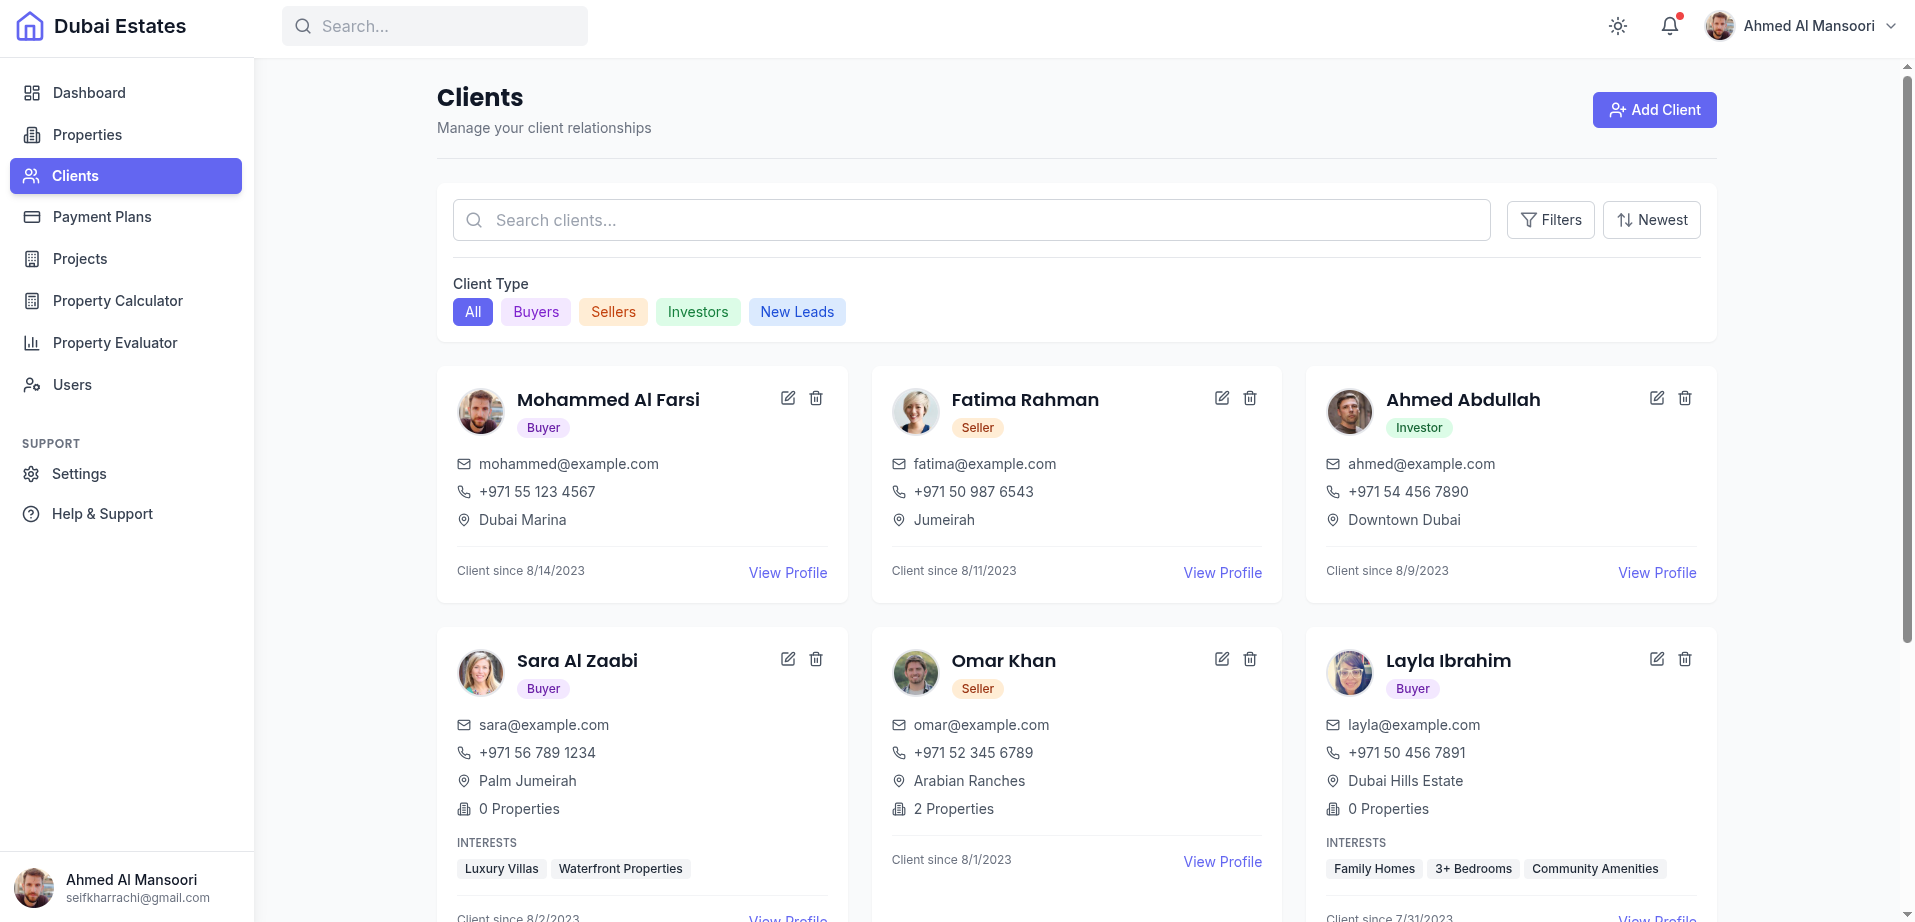
- Client Filters: Filter clients by type and other criteria
- Client Cards: Display client information with contact details
- Client Action: Edit/delete/insert/filter by
D.4 Commission Management
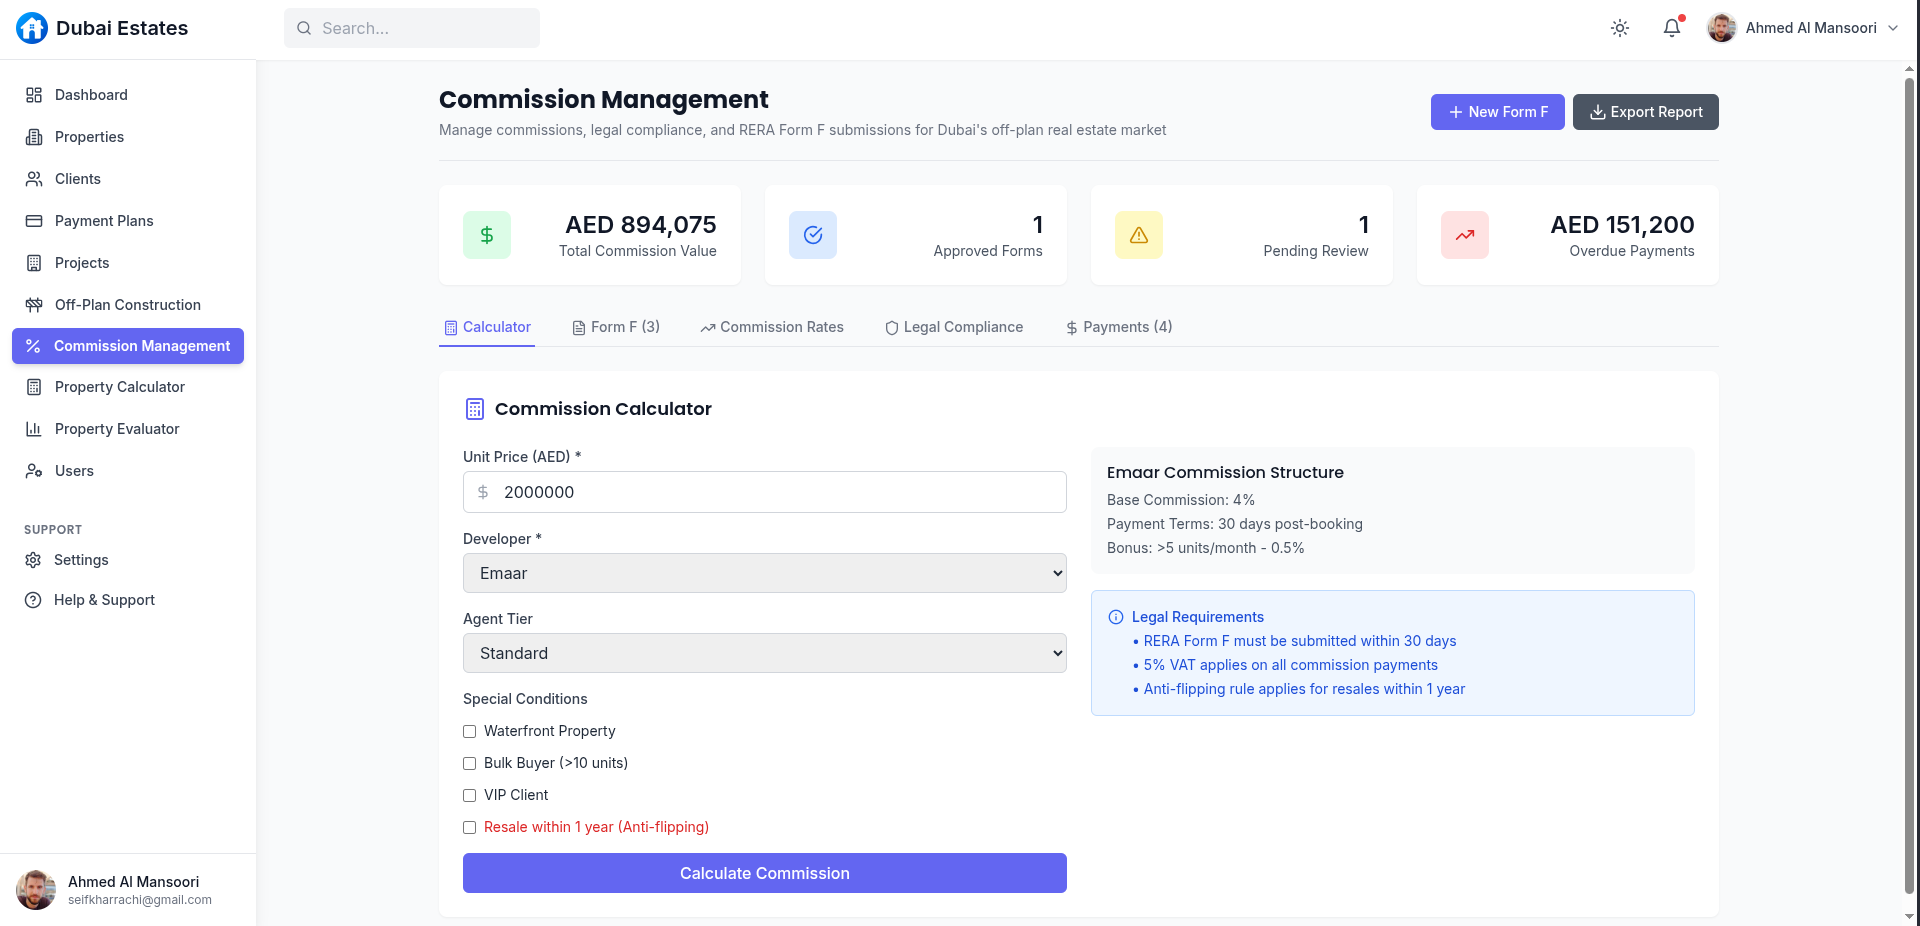
- Commission Calculator: Calculate commissions based on various factors
- Form F Generator: Generate RERA Form F submissions
- Form F Generator: Generate RERA Form F submissions
- Commision rates
- Legal Compliance
D.5 Off-Plan Construction
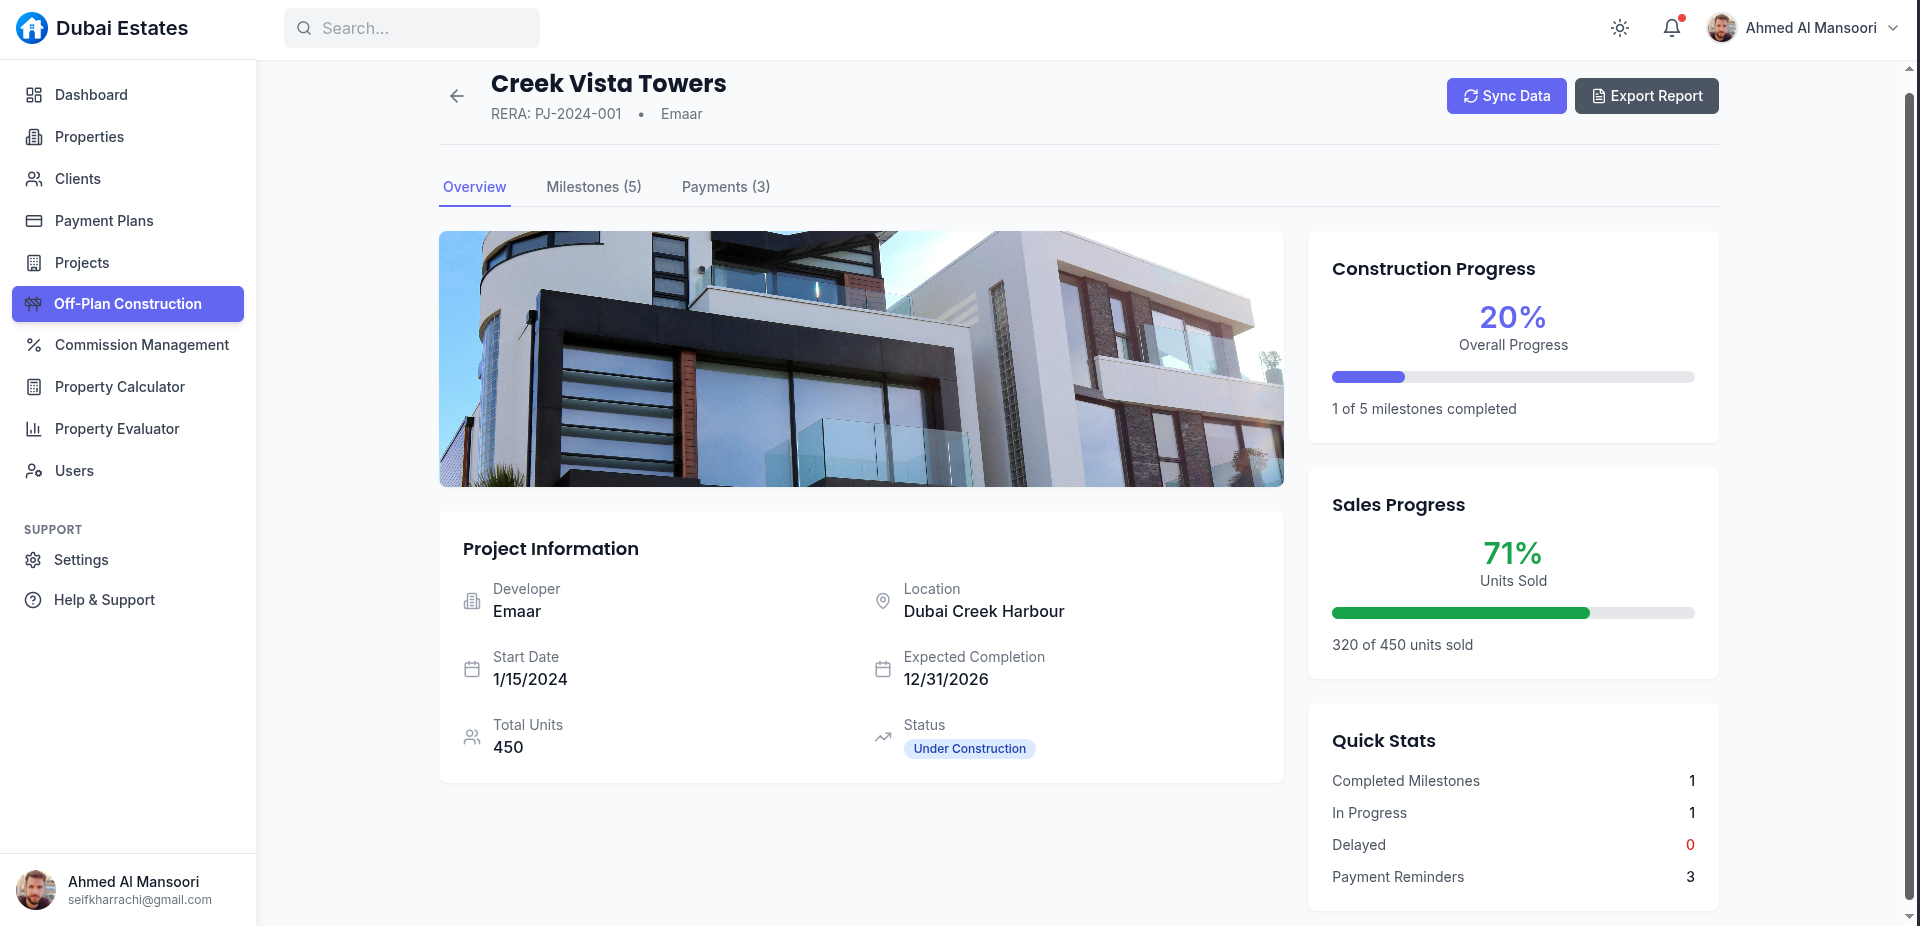
- Project Cards: Display off-plan project information + view project details
- Milestone Timeline: Track construction progress
- Payments:
D.6 User ( Broker / Agent..etc) Management
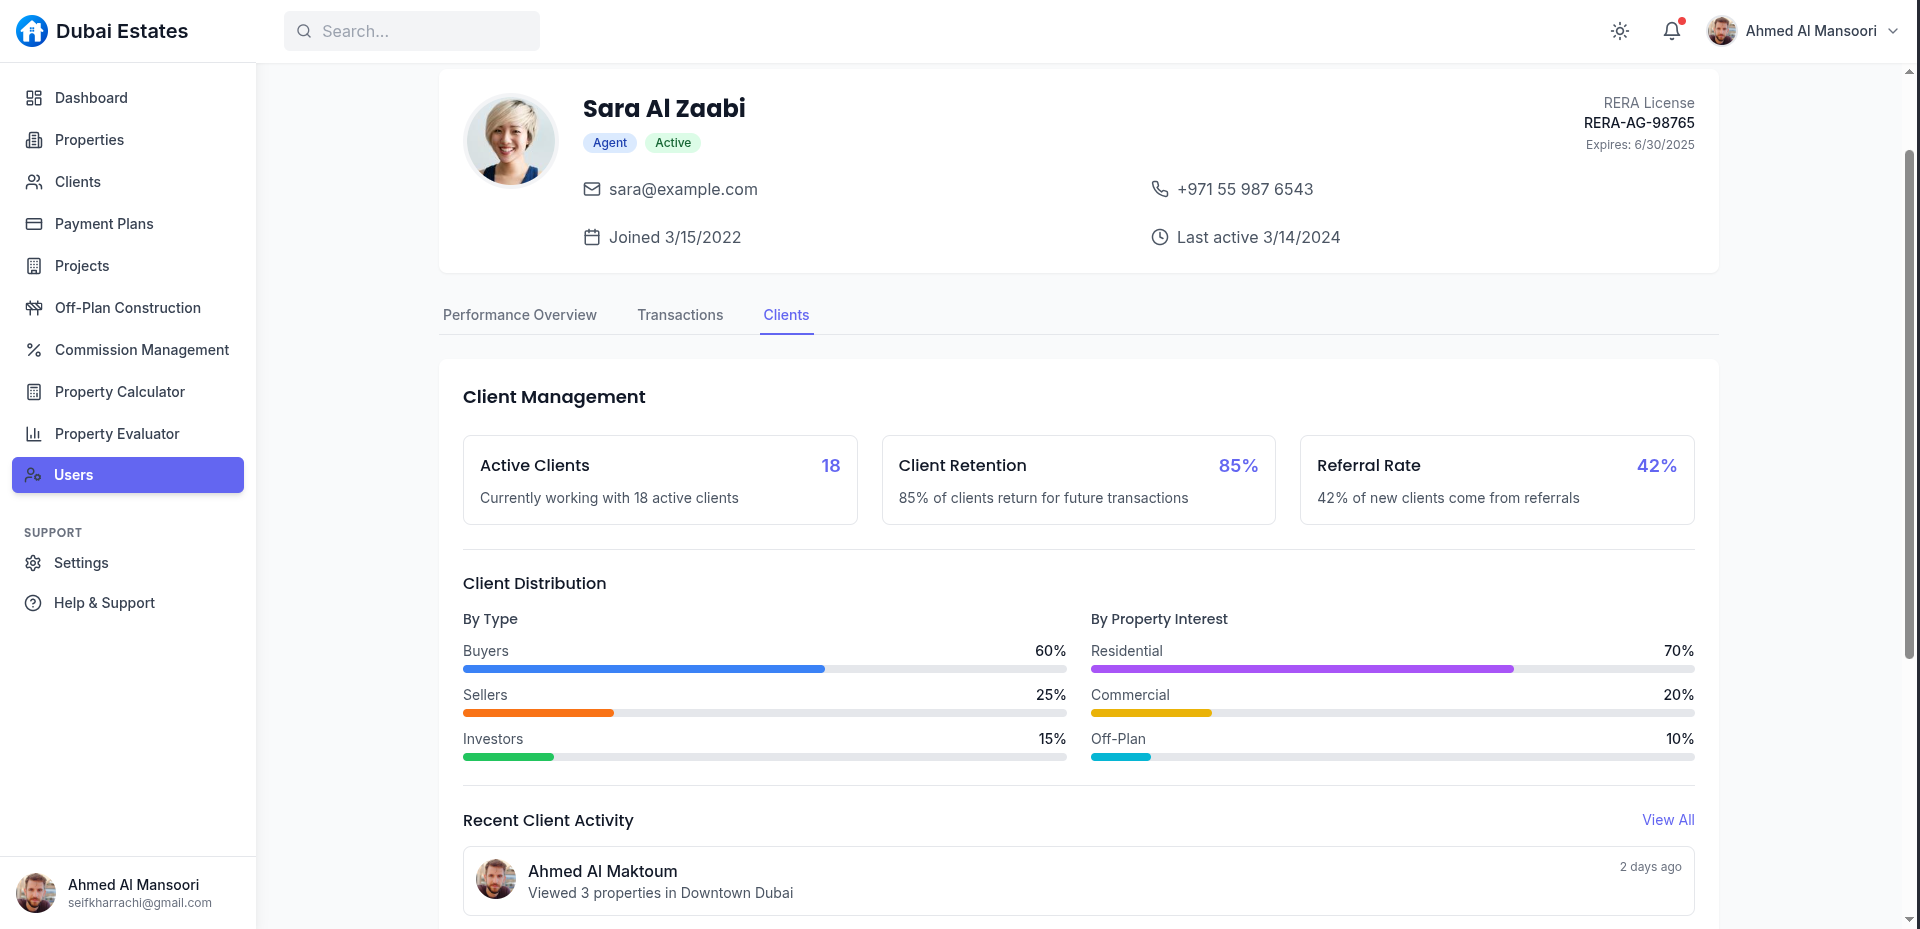
- Add New Users: Filter clients by type and other criteria
- View : performance , deals , commisions...etc
E. File Structure
Understanding the file structure will help you navigate and customize the dashboard effectively:
/src
  /components         # Reusable UI components
    /auth            # Authentication components
    /clients         # Client management components
    /commission      # Commission calculation components
    /dashboard       # Dashboard overview components
    /layout          # Layout components (sidebar, header)
    /offplan         # Off-plan construction components
    /properties      # Property management components
    /reports         # PDF report generators
    /ui              # Generic UI components
  /contexts          # React context providers
  /hooks             # Custom React hooks
  /pages             # Page components
    /auth           # Authentication pages
  /services          # API services
  /store             # Redux store configuration
    /slices         # Redux slices for state management
  /types             # TypeScript type definitions
  /utils             # Utility functions and mock data
  App.css            # Global CSS styles
  App.tsx            # Main application component
  index.css          # Tailwind CSS imports
  main.tsx           # Application entry point
Key Files
| File | Description |
|---|---|
src/App.tsx |
Main application component with routing configuration |
src/components/layout/DashboardLayout.tsx |
Main layout for authenticated pages |
src/components/layout/Sidebar.tsx |
Sidebar navigation component |
src/contexts/AuthContext.tsx |
Authentication context provider |
src/utils/mockData.ts |
Mock data for dashboard elements |
tailwind.config.js |
Tailwind CSS configuration |
F. How to Edit / Delete Content
Editing Properties
- View Properties: Navigate to the Properties page from the sidebar
- Add Property: Click the "Add Property" button to open the property form
- Edit Property: Click the edit icon on any property card to modify its details
- Delete Property: Click the delete icon and confirm to remove a property
Warning: Deleting a property is permanent and cannot be undone. Make sure to confirm before proceeding.
Property Form Fields
The property form includes the following fields:
- Property Title: The name of the property
- Property Type: Apartment, Villa, Townhouse, etc.
- Status: For Sale or For Rent
- Location: Area or neighborhood
- Price: Property price in AED
- Bedrooms: Number of bedrooms
- Bathrooms: Number of bathrooms
- Area: Property size in square feet
- Image URL: Link to the property image
- Description: Detailed property description
Editing Clients
- View Clients: Navigate to the Clients page from the sidebar
- Add Client: Click the "Add Client" button to open the client form
- Edit Client: Click the edit icon on any client card to modify their details
- Delete Client: Click the delete icon and confirm to remove a client
- View Client Details: Click the "View Profile" button to see detailed client information
Client Form Fields
The client form includes the following fields:
- Full Name: Client's full name
- Email Address: Client's email
- Phone Number: Client's contact number
- Client Type: Buyer, Seller, Investor, etc.
- Location: Client's location
- Properties Owned/Interested: Number of properties
- Interests: Client's property interests
- Avatar URL: Link to client's profile image
- Notes: Additional information about the client
Editing Users
- View Users: Navigate to the Users page from the sidebar
- Add User: Click the "Add User" button to open the user form
- View User Details: Click the eye icon to view detailed user information
- Edit User: Click the edit icon on any user card to modify their details
- Delete User: Click the delete icon and confirm to remove a user
User Form Fields
The user form includes the following fields:
- Full Name: User's full name
- Email Address: User's email (used for login)
- Phone Number: User's contact number
- Role: Admin, Agent, Manager, etc.
- Password: User's password
- Permissions: Specific access permissions
Note: Only administrators can add, edit, or delete users. Regular users will not have access to the Users page.
Editing Commission Management
The Commission Management module provides tools for calculating and tracking real estate commissions in compliance with Dubai regulations.
Commission Calculator
- Access: Navigate to Commission Management > Calculator tab
- Calculate: Enter property details, select developer, and apply special conditions
- Generate Form F: Use calculation results to automatically generate RERA Form F
Form F Management
- View Forms: Navigate to Commission Management > Form F tab
- Create Form: Click "New Form F" to create a new submission
- Submit Form: Complete the form and click "Submit to RERA"
- Download XML: Generate XML file for official submission
Legal Compliance
- View Requirements: Navigate to Commission Management > Legal Compliance tab
- Mark Compliant: Update compliance status for each requirement
- View Details: Click on any requirement to see detailed information
Note: The Commission Management module implements Dubai Land Department (DLD) regulations, including RERA Form F requirements and anti-flipping rules.
Editing Off-Plan Construction
The Off-Plan Construction module allows tracking of construction projects, milestones, and payment reminders.
Project Management
- View Projects: Navigate to Off-Plan Construction > Projects tab
- Filter Projects: Use the search and filter options to find specific projects
- View Details: Click on a project card or the eye icon to see detailed information
- Sync Data: Use the "Sync Data" button to update project information from developer APIs
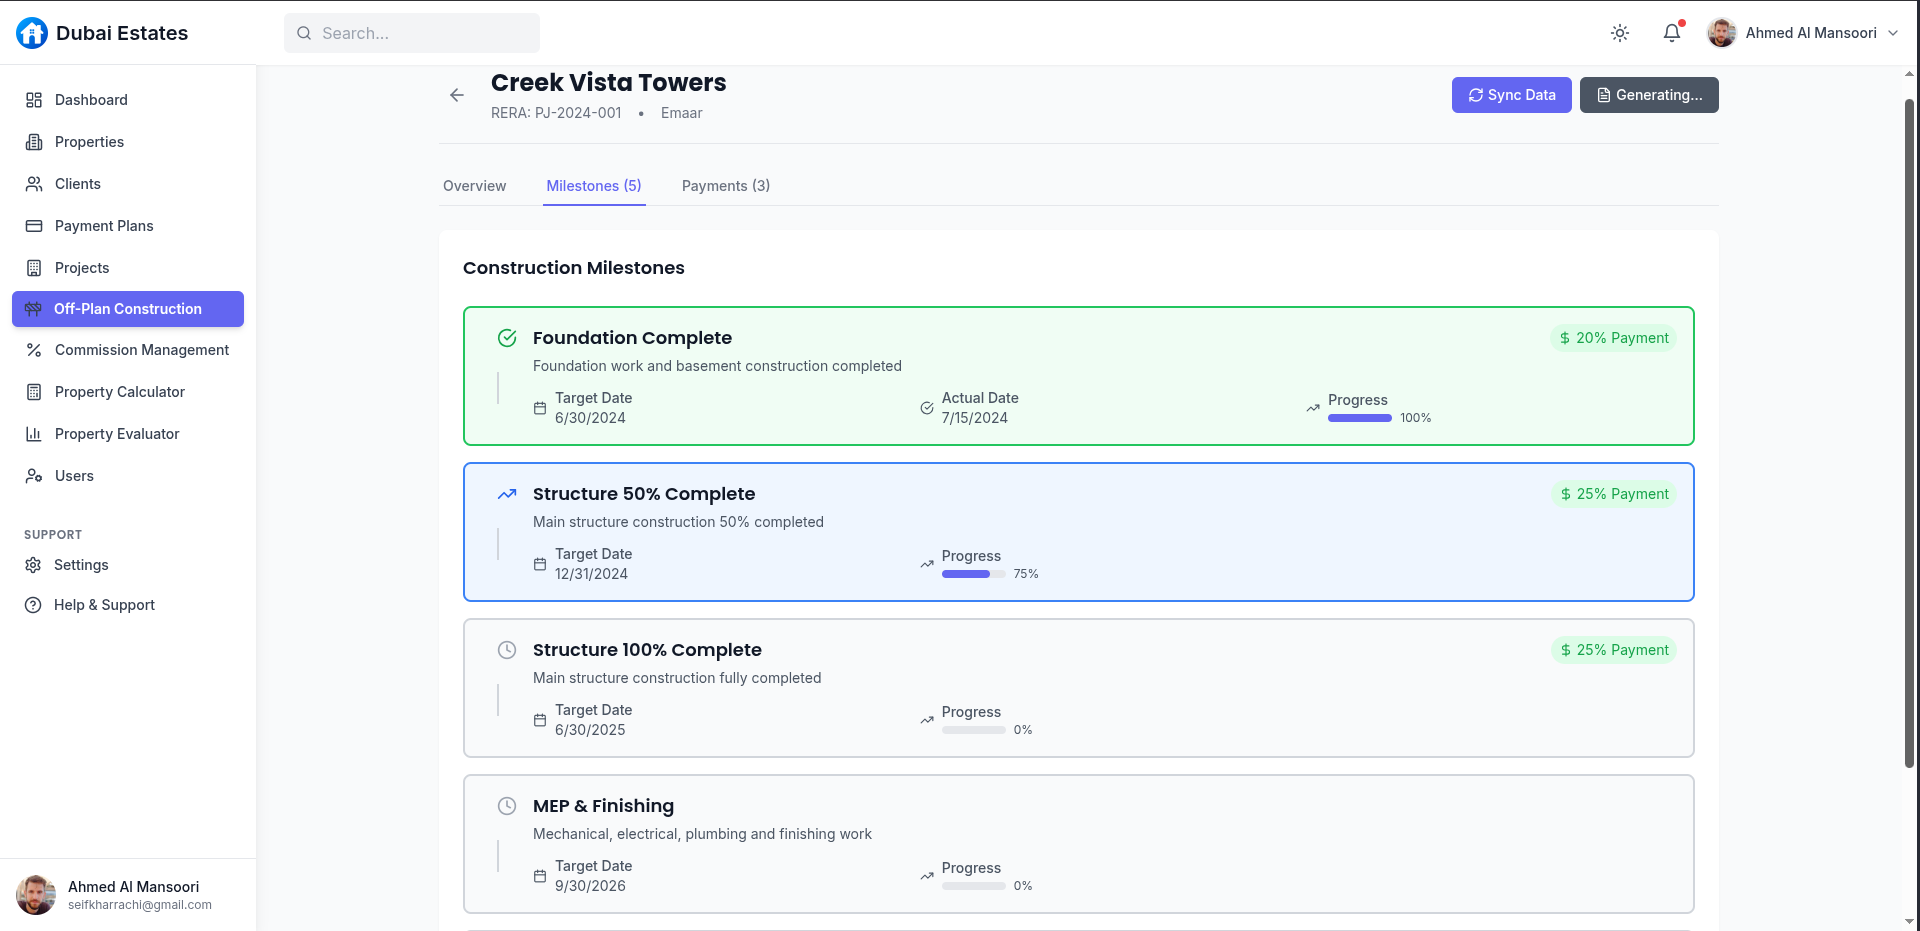
Milestone Tracking
- View Milestones: Navigate to a project's details page and select the Milestones tab
- Track Progress: Monitor construction progress through the milestone timeline
- Update Status: Update milestone completion percentages and status
Payment Reminders
- View Reminders: Navigate to Off-Plan Construction > Payment Reminders tab
- Send Reminder: Click "Send Reminder" to notify clients of upcoming payments
- Mark as Paid: Update payment status when payments are received
Developer API Configuration
- Access Configuration: Click the "API Config" button in the Off-Plan Construction page
- Configure APIs: Set up connection details for different developer APIs
- Test Connection: Verify API connectivity before saving configuration
Editing Property Tools
The dashboard includes specialized tools for property valuation and investment analysis.
Property Calculator
- Access: Navigate to Property Calculator from the sidebar
- Input Details: Enter property price, financing details, and rental information
- View Results: See calculated mortgage payments, cash flow, and investment metrics
- Generate Report: Create a PDF report of the investment analysis
Property Evaluator
- Access: Navigate to Property Evaluator from the sidebar
- Input Property Details: Enter property type, location, size, and other characteristics
- View Valuation: See the estimated market value with confidence score
- Understand Factors: Review the valuation factors that influence the property price
- Generate Report: Create a PDF report of the property valuation
Tip: The Property Evaluator uses advanced algorithms based on Dubai market data to provide accurate valuations for different property types and locations.
G. Core Libraries
The Dubai Real Estate Dashboard is built using a carefully selected set of modern libraries and frameworks to ensure optimal performance, maintainability, and developer experience.
Frontend Framework
- React 18.3.1 - Core UI library for building component-based interfaces
- TypeScript 5.5.3 - Strongly-typed JavaScript for improved code quality and developer experience
- Vite 5.4.2 - Next-generation frontend build tool with extremely fast HMR (Hot Module Replacement)
State Management
- Redux Toolkit 2.2.1 - Official, opinionated Redux toolset for efficient Redux development
- React Redux 9.1.0 - Official React bindings for Redux
- Redux Persist 6.0.0 - Persist and rehydrate Redux stores
Routing
- React Router Dom 6.22.3 - Declarative routing for React applications
UI Components
- Tailwind CSS 3.4.1 - Utility-first CSS framework for rapid UI development
- Lucide React 0.344.0 - Beautiful & consistent icon set as React components
- React Hot Toast 2.4.1 - Lightweight notification system for React applications
Data Visualization
- Recharts 2.12.3 - Composable charting library built on React components
Document Generation
- React PDF Renderer 3.4.0 - Create PDF documents using React components
- QRCode React 3.1.0 - QR code generator for React applications
Development Tools
- ESLint 9.9.1 - Pluggable JavaScript linter
- PostCSS 8.4.35 - Tool for transforming CSS with JavaScript
- Autoprefixer 10.4.18 - PostCSS plugin to parse CSS and add vendor prefixes
Note: All libraries are regularly updated to ensure security and compatibility with the latest web standards.
H. Algorithms & Calculations
The Dubai Real Estate Dashboard implements several sophisticated algorithms to provide accurate financial calculations and property valuations.
Commission Calculation Algorithm
Location: This algorithm is implemented in src/utils/commissionCalculator.ts. To replace or modify it, edit this file directly.
The commission calculation system implements Dubai Land Department (DLD) regulations for real estate commissions:
// Commission calculation algorithm
export const calculateCommission = (
  unitPrice: number,
  developer: string,
  agentTier: 'standard' | 'gold' | 'platinum' = 'standard',
  isWaterfront: boolean = false,
  isBulkBuyer: boolean = false,
  isVipClient: boolean = false,
  resaleWithinYear: boolean = false
): CommissionCalculation => {
  // Find developer rates
  const developerRate = COMMISSION_RATES.find(rate =>
    rate.developer.toLowerCase() === developer.toLowerCase()
  );

  // Calculate base commission
  let baseRate = developerRate.baseCommission / 100;
  const bonuses = [];

  // Apply special conditions (waterfront, bulk buyer, VIP client)
  // Apply agent tier bonuses

  // Calculate gross commission
  const baseCommission = unitPrice * (developerRate.baseCommission / 100);
  const bonusAmount = bonuses.reduce((sum, bonus) => sum + bonus.amount, 0);
  const grossCommission = baseCommission + bonusAmount;

  // Apply anti-flipping rule (30% reduction if resold within 1 year)
  let antiFlippingReduction = 0;
  let finalGrossCommission = grossCommission;

  if (resaleWithinYear) {
    antiFlippingReduction = grossCommission * 0.3;
    finalGrossCommission = grossCommission - antiFlippingReduction;
  }

  // Calculate VAT (5%)
  const vat = finalGrossCommission * 0.05;
  const totalPayable = finalGrossCommission + vat;

  return {
    unitPrice,
    developer,
    agentTier,
    isWaterfront,
    isBulkBuyer,
    isVipClient,
    baseCommission,
    bonuses,
    grossCommission: finalGrossCommission,
    vat,
    totalPayable,
    antiFlippingReduction: resaleWithinYear ? antiFlippingReduction : undefined
  };
};
Property Valuation Algorithm
Location: This algorithm is implemented in src/store/slices/evaluatorSlice.ts in the calculateValuation reducer. To replace it, modify this reducer function.
The property evaluator uses a sophisticated algorithm that considers multiple factors to determine property value:
// Property valuation algorithm
const calculateValuation = (state) => {
  // Base price calculation based on property type and area
  const baseRates = {
    'Apartment': 1200,
    'Villa': 1400,
    'Townhouse': 1300,
    'Penthouse': 1600
  };

  const baseRate = baseRates[state.propertyDetails.type] || 1200;
  const initialBasePrice = baseRate * state.propertyDetails.area;

  // Apply location multiplier
  const locationMultiplier = LOCATION_MULTIPLIERS[state.propertyDetails.location] || 1.0;

  // Apply condition multiplier
  const conditionMultiplier = CONDITION_MULTIPLIERS[state.propertyDetails.condition] || 1.0;

  // Apply view premium
  const viewMultiplier = VIEW_MULTIPLIERS[state.propertyDetails.view] || 1.0;

  // Apply age depreciation
  const ageImpact = Math.max(-20, -state.propertyDetails.age * 0.5);

  // Apply amenities bonus
  const amenitiesImpact = state.propertyDetails.amenities.length * 2;

  // Calculate final adjusted price with weighted factors
  // Calculate confidence score based on data quality

  return adjustedPrice;
};
ROI Calculator Algorithm
Location: This algorithm is implemented in src/store/slices/calculatorSlice.ts in the calculateResults reducer. To replace it, modify this reducer function.
The property calculator implements investment analysis calculations:
// ROI calculation algorithm
const calculateROI = () => {
  // Calculate loan amount
  const calculatedLoanAmount = propertyPrice * (1 - downPayment / 100);

  // Calculate monthly mortgage payment
  const monthlyInterestRate = interestRate / 100 / 12;
  const numberOfPayments = loanTerm * 12;
  const calculatedMonthlyMortgage =
    calculatedLoanAmount *
    (monthlyInterestRate * Math.pow(1 + monthlyInterestRate, numberOfPayments)) /
    (Math.pow(1 + monthlyInterestRate, numberOfPayments) - 1);

  // Calculate monthly expenses
  const monthlyPropertyTax = (propertyPrice * propertyTax / 100) / 12;
  const monthlyInsurance = insurance / 12;
  const monthlyMaintenance = (propertyPrice * maintenance / 100) / 12;
  const totalMonthlyExpenses = monthlyPropertyTax + monthlyInsurance + monthlyMaintenance + utilities;

  // Calculate monthly cash flow
  const effectiveRent = monthlyRent * (1 - vacancyRate / 100);
  const managementFee = effectiveRent * (propertyManagement / 100);
  const calculatedMonthlyCashFlow = effectiveRent - managementFee - calculatedMonthlyMortgage - totalMonthlyExpenses;

  // Calculate annual cash flow
  const calculatedAnnualCashFlow = calculatedMonthlyCashFlow * 12;

  // Calculate cash on cash return
  const totalInvestment = (propertyPrice * (downPayment / 100)) + (propertyPrice * 0.03);
  const calculatedCashOnCashReturn = (calculatedAnnualCashFlow / totalInvestment) * 100;

  // Calculate cap rate
  const netOperatingIncome = (effectiveRent - managementFee - totalMonthlyExpenses) * 12;
  const calculatedCapRate = (netOperatingIncome / propertyPrice) * 100;

  return {
    loanAmount: calculatedLoanAmount,
    monthlyMortgage: calculatedMonthlyMortgage,
    monthlyExpenses: totalMonthlyExpenses,
    monthlyCashFlow: calculatedMonthlyCashFlow,
    annualCashFlow: calculatedAnnualCashFlow,
    cashOnCashReturn: calculatedCashOnCashReturn,
    capRate: calculatedCapRate
  };
};
Payment Plan Calculation
Location: This algorithm is implemented in src/pages/PaymentPlans.tsx in the calculateMonthlyPayment function. To replace it, modify this function.
The payment plan module calculates installment amounts and schedules:
// Payment plan calculation
const calculateMonthlyPayment = (plan) => {
  const principal = plan.totalAmount - plan.downPayment;
  const monthlyRate = plan.interestRate / 100 / 12;
  const monthlyPayment = (principal * monthlyRate * Math.pow(1 + monthlyRate, plan.installments)) /
                        (Math.pow(1 + monthlyRate, plan.installments) - 1);
  return monthlyPayment;
};
Note: All algorithms implement Dubai-specific real estate regulations and market practices, including DLD guidelines, RERA requirements, and standard industry calculations.
Replacing Algorithms: When replacing any algorithm, ensure that your new implementation maintains the same input and output structure to avoid breaking the UI components that depend on these calculations. If you need to change the data structure, you'll also need to update the corresponding UI components and type definitions.
I. Deployment Guide
This section provides instructions for deploying the Dubai Real Estate Dashboard to production environments.
Deployment with Vercel
Vercel is recommended for deploying this React application due to its simplicity and performance optimizations.
Prerequisites
- A Vercel account
- Git repository with your project (GitHub, GitLab, or Bitbucket)
Deployment Steps
- Prepare Your Project:
- Ensure all environment variables are properly set in your
.envfiles - Run
npm run buildlocally to verify the build process works correctly - Commit all changes to your repository
- Ensure all environment variables are properly set in your
- Import Project to Vercel:
- Log in to your Vercel account
- Click "Add New" > "Project"
- Import your Git repository
- Select the repository containing your dashboard
- Configure Project:
- Framework Preset: Select "Vite"
- Build Command:
npm run build(default) - Output Directory:
dist(default) - Environment Variables: Add any required environment variables
- Deploy:
- Click "Deploy"
- Vercel will build and deploy your application
- Once complete, you'll receive a deployment URL
- Verify Deployment:
- Visit the provided URL to ensure your dashboard is working correctly
- Test all major features including authentication, property management, and reports
Continuous Deployment
Vercel automatically sets up continuous deployment from your Git repository:
- Every push to the main branch will trigger a new production deployment
- Pull requests will generate preview deployments for testing changes
- You can configure branch deployments in the Vercel project settings
Custom Domain Setup
- In your Vercel project, go to "Settings" > "Domains"
- Add your custom domain (e.g., dashboard.yourcompany.com)
- Follow Vercel's instructions to configure DNS settings
- Optionally, enable HTTPS with a free SSL certificate
Environment Variables in Production
For production deployments, set the following environment variables in Vercel:
VITE_APP_TITLE- Application titleVITE_API_URL- Backend API URL (if applicable)- Any other environment-specific variables your application needs
Tip: Use Vercel's "Preview Environments" feature to create isolated environments for testing changes before deploying to production.